


Automatic Transaxle Fluid (ATF)
Inspecting Automatic Transaxle Fluid Level
The automatic transaxle fluid level should be inspected regularly. Measure it as described below.
The volume of fluid changes with temperature. Fluid must be checked while idling the engine without driving at normal operating temperature.
CAUTION:
 Low fluid level causes transaxle
slippage. Overfilling can cause
foaming, loss of fluid, and
transaxle malfunction.
Use specified fluid. A
nonspecified fluid could result in
transaxle malfunction and failure.
1. Park on a level surface and set the parking brake firmly.
2. Start the engine and depress the brake pedal.
3. Move the shift lever through all ranges, then set it at P.
WARNING:
Make sure the brake pedal is applied
before shifting the shift lever:
Shifting the shift lever without first
depressing the brake pedal is
dangerous. The vehicle could move
suddenly and cause an accident.
4. With the engine still idling, pull out the dipstick, wipe it clean, and put it back.
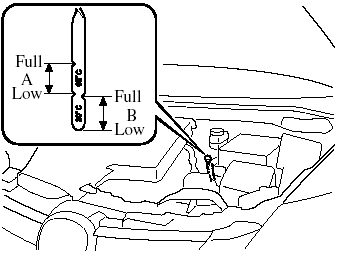
5. Pull it out again.
The proper fluid level is marked on the dipstick as follows.
Fluid hot scale A
When the vehicle has been driven and the fluid is at normal operating temperature, about 65°C (150°F), the level must be between Full and Low.
Fluid cold scale B
When the engine has not been running and the outside temperature is about 20°C (70°F), the fluid level should be close to, but not above, the bottom notch on the dipstick.
CAUTION:
Use the cold scale only as a
reference.
If outside temperature is lower
than about 20°C (70°F), start the
engine and inspect the fluid level
after the engine reaches operating
temperature.
If the vehicle has been driven for
an extended period at high speeds
or in city traffic in hot weather,
inspect the level only after
stopping the engine and allowing
the fluid to cool for 30 minutes.
Fully insert the dipstick. When adding fluid, inspect with the dipstick to make sure it doesn't pass full.
NOTE:
Inspect the fluid on both sides of the dipstick in
a well lit area for an accurate reading.
See also:
Accessory Sockets
The ignition switch must be in the ACC
or ON position.
Only use genuine Mazda accessories or
the equivalent requiring no greater than
120 W (DC 12 V, 10 A).
The accessory socket is in the center
...
Interior Lights
Illuminated Entry System
When the illuminated entry system
operates, the overhead light (switch is in
the DOOR position) turns on for:
- About 30 seconds after the driver's
door is unlocked and t ...
Satisfying Drivetrain
What you get for your diminished mileage is respectable but not exceptional
acceleration. Though the 2.3-liter four-cylinder (to be replaced in the 2010 by
a 2.5-liter) is pretty robust, the Mazda ...