Audio Set
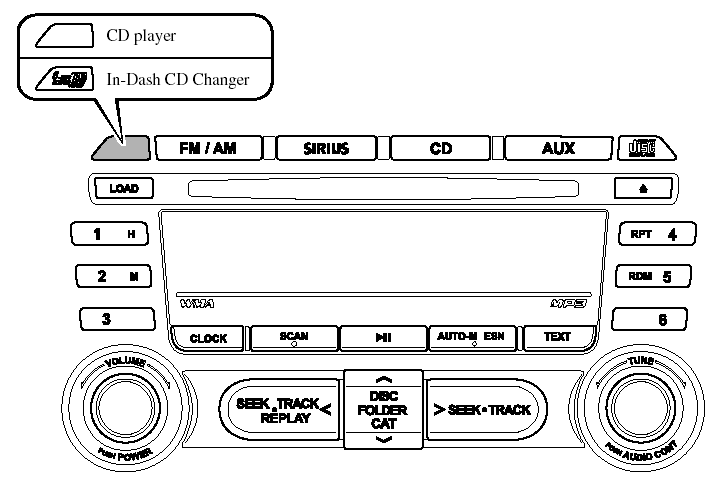
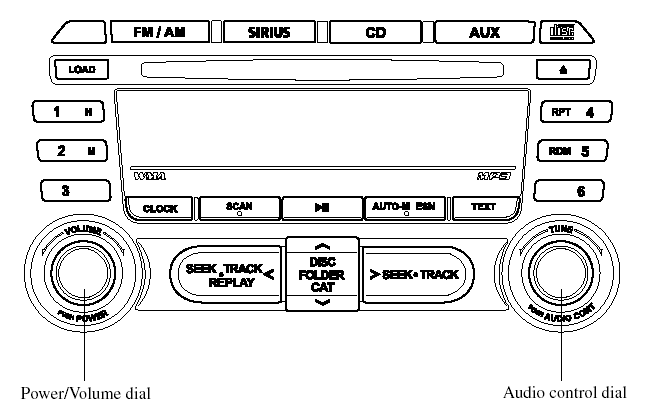
Power/Volume/Sound Controls
Power ON/OFF
Turn the ignition switch to the ACC or ON position.
Press the power/volume dial to turn the audio system on.
Press the power/volume dial again to turn the audio system off.
NOTE:
To prevent the battery from being discharged,
do not leave the audio system on for a long
period of time when the engine is not running.
Volume adjustment
To adjust the volume, turn the power/ volume dial.
Turn the power/volume dial to the right to increase volume, to the left to decrease it.
Audio sound adjustment
1. Press the audio control dial to select the function. The selected function will be indicated.
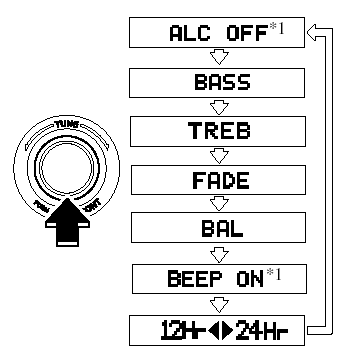
Standard audio-equipped model
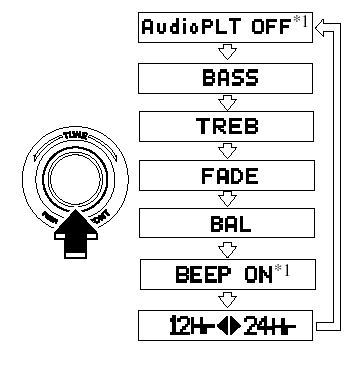
Bose Sound System-equipped model
*1 Depending on the mode selected, the indication changes.
2. Turn the audio control dial to adjust the selected functions as follows:
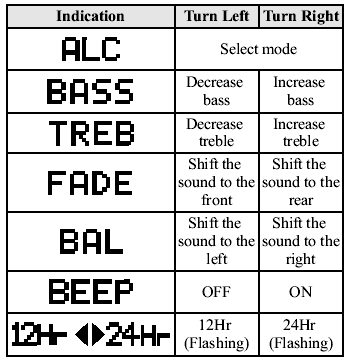
Standard audio-equipped model
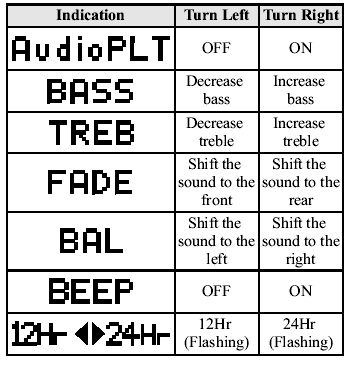
Bose® Sound System-equipped model
NOTE:
About 5 seconds after selecting any mode, the
volume function will be automatically selected.
To reset bass, treble, fade, and balance, press the audio control dial for 2 seconds. The unit will beep and “CLEAR” will be displayed.
Automatic Level Control (ALC)
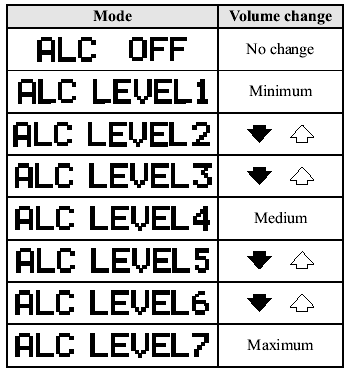
The automatic level control is a feature that automatically adjusts audio volume and sound quality according to the vehicle speed.
The volume increases in accordance with the increase in vehicle speed, and decreases as vehicle speed decreases.
Select the desired ALC mode.
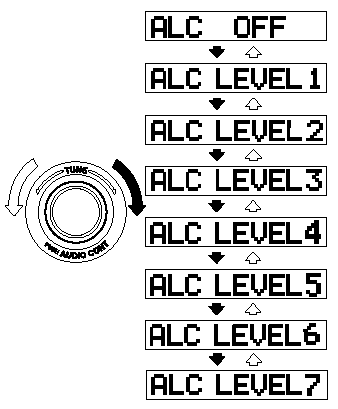
Turn the audio control dial to select ALC OFF or ALC LEVEL1―7 modes. The selected mode will be indicated.
*AudioPilot® 2 (Bose® Sound Systemequipped model)
AudioPilot® 2 automatically adjusts audio volume and sound quality in accordance with the level of noise entering the vehicle interior while driving. When AudioPilot® 2 is turned on, the system automatically calculates the conditions for optimum hearing of sound which may be difficult to hear depending on exterior noise.
The system is also equipped to optimally adjust the acoustic characteristics automatically while the roof is open or closed. The acoustic adjustment occurs with the lock/unlock operation of the top latch on the roof, and while the adjustment is being done, the audio is muted for about 1.5 sec, and then fades in.
* AudioPilot® 2 is a registered trademark of Bose Corporation.
BEEP setting
The beep-sound when operating the audio system can be set on or off.
Time adjustment
Rotating the audio control dial switches the display between 12 and 24-hour clock time.
Clock
Setting the time
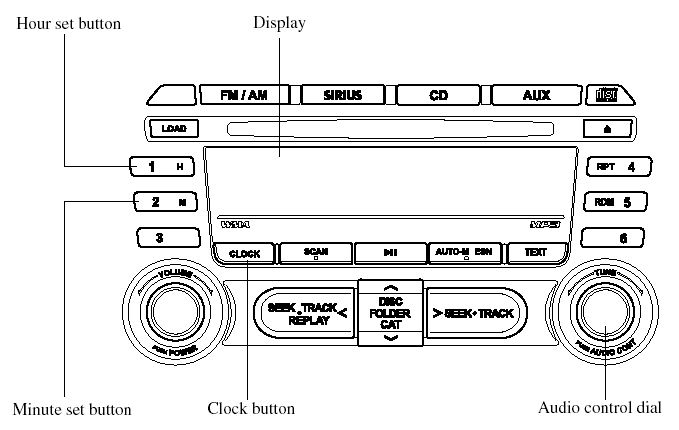
The clock can be set at any time when the ignition switch is in the ACC or ON position.
1. To adjust the time, press the clock
button (  ) for about 2 seconds
until a beep is heard.
The clock's current time will flash.
2. To advance the hours, press the hour
set button (  ). To advance the
minutes, press the minute set button
(  ) while the time is
flashing.
3. Press the clock button (  )
)
again
to start the clock.
NOTE:
- When the clock button (
 )
)
is
released, the seconds are reset to “00”.
- If the power supply to the unit is interrupted (if the fuse blows or the vehicle's battery is disconnected), the clock will need to be reset.
Operating the Radio
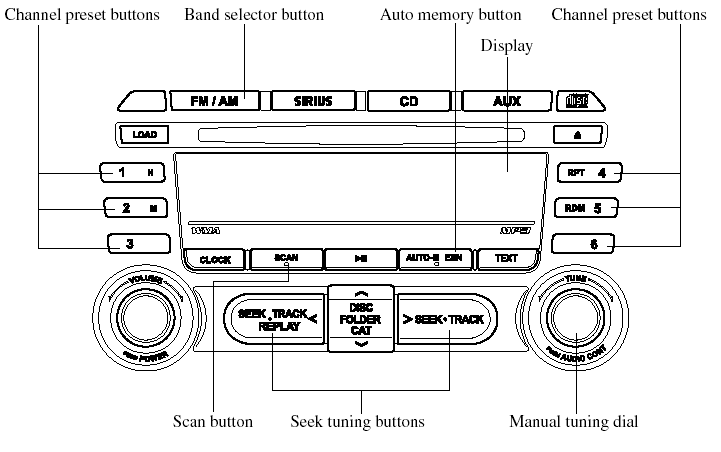
Radio ON
Press a band selector button (
 ) to
) to
turn the radio on.
Band selection
Successively pressing the band selector
button ( ) switches the bands
as
follows: FM1→FM2→AM.
The selected mode will be indicated. If FM stereo is being received, “ST” will be displayed.
NOTE:
If the FM broadcast signal becomes weak,
reception automatically changes from
STEREO to MONO for reduced noise, and the
“ST” indicator will go out.
Tuning
The radio has the following tuning methods: Manual, Seek, Scan, Preset channel, and Auto memory tuning. The easiest way to tune stations is to set them on preset channels.
NOTE:
If the power supply is interrupted (fuse blows
or the battery is disconnected), the preset
channels will be erased.
Manual tuning
Turning the manual tuning dial will change the frequency higher or lower.
Seek tuning
Pressing the seek tuning button (
 ).
).
will cause the tuner to seek a higher or
lower frequency automatically.
NOTE:
If you continue to press and hold the button,
the frequency will continue changing without
stopping.
Scan tuning
Press the scan button (  )
)
to
automatically sample strong stations.
Scanning stops at each station for about 5
seconds. To hold a station, press the scan
button ( ) again during this
interval.
Preset channel tuning
The 6 preset channels can be used to store 6 AM and 12 FM stations.
1. To set a channel first select AM, FM1, or FM2. Tune to the desired station.
2. Depress a channel preset button for about 2 seconds until a beep sound is heard. The preset channel number and station frequency will be displayed.
The station is now held in the memory.
3. Repeat this operation for the other stations and bands you want to store.
To tune one in the memory, select AM, FM1, or FM2 and then press its channel preset button. The station frequency and the channel number will be displayed.
NOTE:
If the power supply is interrupted (fuse blows
or the battery is disconnected), the preset
channels will be erased.
Auto memory tuning
This is especially useful when driving in an area where the local stations are not known. Additional AM/FM stations can be stored without disturbing the previously set channels.
Press and hold the auto memory button
( ) for about 2 seconds until
a beep
sound is heard; the system will
automatically scan and temporarily store
up to 6 stations with the strongest
frequencies in each selected band in that
area.
After scanning is completed, the station with the strongest frequency will be tuned and its frequency displayed.
Press and release the auto memory button
(  ) to recall stations from
the autostored
stations. One stored station will be
selected each time; its frequency and
channel number will be displayed.
NOTE:
If no stations can be tuned after scanning
operations, “A” will be displayed.
Operating the Satellite Radio
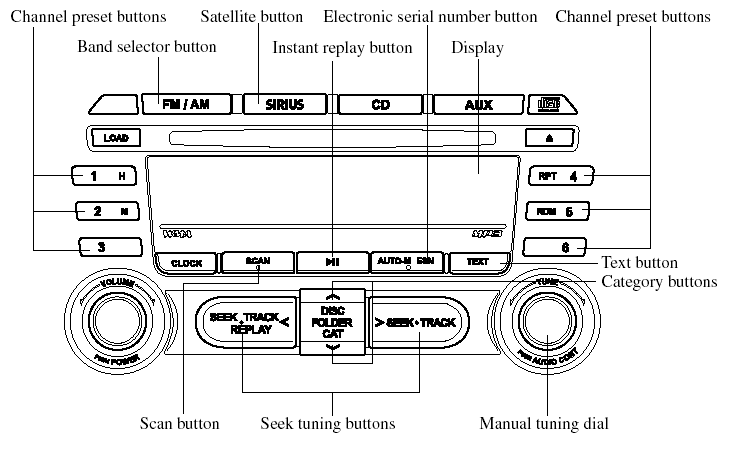
Information display
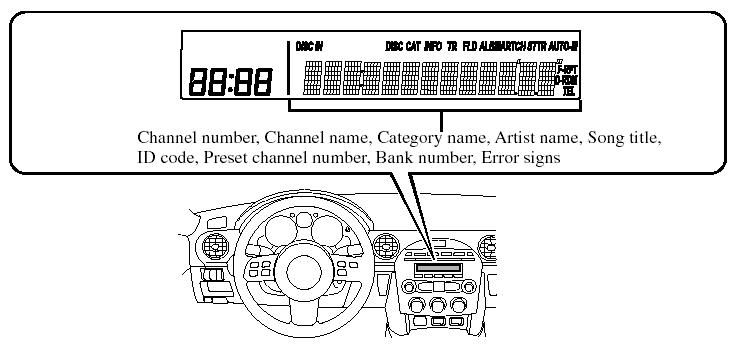
All operations of the satellite radio are displayed on the Information display.
NOTE:
This equipment has been tested and found to
comply with the limits for a Class B digital
device, pursuant to Part 15 of the FCC Rules.
These limits are designed to provide reasonable protection against harmful interference in a residential installation. This equipment generates, uses, and can radiate radio frequency energy and if not installed and used in accordance with the instructions, may cause harmful interference to radio communications. However, there is no guarantee that interference will not occur in a particular installation. If this equipment does cause harmful interference to radio or television reception, which can be determined by turning the equipment off and on, the user is encouraged to try to correct the interference by one or more of the following measures: - Increase the separation between the equipment and tuner.
- Connect the equipment into an outlet on a circuit different from that to which the tuner is connected.
- Consult the dealer or an experienced radio/ TV technician for help.
What is satellite radio?
SIRIUS is radio the way it was meant to be: More than 100 new channels of digital quality programming delivered to listeners coast to coast via satellite. That means channels of completely commercial-free music plus more channels of news, sports, and entertainment from names like CNBC, Discovery, SCI-FI Channel, A&E, House of Blues, E!, NPR, Speed vision and ESPN.
SIRIUS is live, dynamic entertainment, completely focused on listeners. Every minute of every day of every week will be different. All commercial-free music channels are created in-house and hosted by DJs who know and love the music. Do you like Reggae? How about Classic Rock or New Rock? SIRIUS has an array of choices spanning a vast range of musical tastes including the hits of the 50's, 60's, 70's, & 80's as well as Jazz, Country, Blues, Pop, Rap, R&B, Bluegrass, Alternative, Classical, Heavy Metal, Dance and many others.
From its state-of-the-art, digital broadcasting facility in Rockefeller Center, New York City, SIRIUS will deliver the broadest, deepest mix of radio entertainment from coast to coast.
SIRIUS will bring you music and entertainment programming that is simply not available on traditional radio in any market across the country. It's radio like you've never heard before.
Sign up for SIRIUS Radio today! For more information, visit siriusradio.com.
Satellite radio can be subscribed to and received in the United States. (Except Alaska and Hawaii) and Canada.
How to subscribe to satellite radio
Once the system is installed you must first subscribe to the SIRIUS Radio service to activate the system.
The SIRIUS Radio service uses an ID
code to identify your radio. This code is
needed to subscribe to SIRIUS Radio, and
if needed, is also used to report any
problems should there be any in the
future. Listeners can subscribe using any
of the following methods:
- Visiting SIRIUS on the web at
www.sirius.com
- Subscribing to SIRIUS customer care,
available 24 hours a day, 7 days a
week.
- Calling (888) 539-7474 - E-mail at: customercare@siriusradio.
com
- Writing to: SATELLITE RADIO
1221 Avenue of the Americas
New York, NY 10020
Attention: Customer Care
Customers should have their SIRIUS
Radio ID Electronic Serial Number
(ESN#) ready.
NOTE:
Your ESN# should have been recorded at the
time of installation. If not, press the ESN
button for 1.5 seconds or longer to display the
12-digit ESN for the SIRIUS tuner.
Satellite radio activation
For activation and subscription information call toll-free at 1-888-539- SIRI (7474). A SIRIUS Customer Care representative will take the necessary information and walk you through the activation process. Or you can visit SIRIUS online at WWW.siriusradio.com and click on the “Join” button.
When you call the SIRIUS Customers Care number you have two options available.
(1) The full package which allows you access to all SIRIUS content except pay- per-view.
(2) The family package which allows access to certain channels. Please see the website: www.sirius.com for details.
Please have the following information
ready when attempting to activate your
service:
- SIRIUS ID (ESN*).
- Valid credit card information (type, number, expiration date).
When you are ready to receive the on-air activation signals you will be instructed (for activation via phone) to turn on your tuner, have the antenna pointed skyward, and to set the channel to channel 184.
Once the signal is sent from the national studio it may take up to ten minutes to be received by your unit.
NOTE:
On-air activation is completed after the
procedure, in most cases from ten seconds to
ten minutes.
* ESN: Electronic Serial Number
SIRIUS operation
All operations of the satellite radio are conducted by means of the audio unit.
SIRIUS radio mode selection
When the satellite button is pressed during ACC ON, it will play the last SIRIUS channel in use before the mode was switched over to another mode or the power was turned off.
When the satellite button is pressed in a mode other than the SIRIUS mode, the last channel in use will be received.
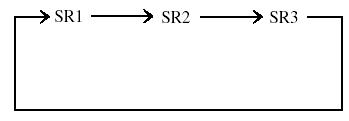
Every time the satellite button is pressed, the bank changes in the order shown below.
NOTE:
SR1, SR2 and SR3: six stations can be stored
in each bank for convenient access to your
favorite stations.
Operation in the initial state
It may take some time to start up the equipment when it is in the initial state, when there is a change in the user's subscription condition, or when the SIRIUS channel map is changed.
“UPDATING xx%” is displayed when the SIRIUS channel map is changed. If the unit is initialized or the user contract content is changed, “UPDATING” is displayed. Updating could take as long as three minutes depending on the geographical area. When the unit is in an initialized state, channel 184 is displayed after the display indicates “UPDATING 100%”. If the SIRIUS channel map or the user contract content is changed, the channel prior to the change is displayed after “UPDATING” is displayed. After the initialization display, it may take as long as 12 seconds to receive channel 184.
When the SIRIUS mode is switched to another mode, or when the power is turned off, the present channel which is being received is stored as the last channel.
Channel selection
Turning the manual tuning dial allows you to select the desired receiving channel.
- Turn the knob clockwise: Channel Up - Turn the knob counterclockwise: Channel Down
Unsubscribed channel
When a selected station has not been
subscribed to, the display indicates the
following:
[CALL 888] and [539 SIRI]
(Flashes alternately)
NOTE:
When the subscription contract is canceled, all
of the channels including channel 184 appear
as unsubscribed.
Invalid channel
When a selected channel is not
broadcasting, [SR (bank
(bank
number)![INVALID] is displayed for one second,](images/books/1132/pages/13/parsin13.gif)
INVALID] is displayed for one second,
followed by [SR ![CHANNEL], which is also displayed for](images/books/1132/pages/13/parsin14.gif) (bank number)
(bank number)![CHANNEL], which is also displayed for](images/books/1132/pages/13/parsin15.gif)
CHANNEL], which is also displayed for
one second. The display then returns to
the previous valid channel.
NOTE:
If the last channel selected has become
unavailable because of a channel update the
above indication is displayed until any button
is pressed.
Preset channel programming
(Programming with “channel number” display)
1. Select the desired channel to be
programmed. At this point, the
following is displayed:
[SR  (bank number)
![number)]](images/books/1132/pages/13/parsin14.gif) (channel
(channel
number)]
2. Keep pressing the channel preset
button for 1.5 seconds or more.
The programming process is complete
after the channel number flashes. Then,
[SR  (bank number)] is
displayed
and a beep sound is heard at the same
time.
3. [SR  (bank number)
 CH
CH
(preset number) ![number)]](images/books/1132/pages/13/parsin14.gif) (channel
(channel
number)]
are displayed.
(Programming with “text” display (e.g.
channel name))
1. Select the desired channel to be
programmed. At this point, the
following is displayed:
[SR  (bank number)
![text (e.g. channel name))]](images/books/1132/pages/13/parsin14.gif) (selected
(selected
text (e.g. channel name))]
2. Keep pressing the channel preset
button for 1.5 seconds or more.
The programming process is complete after the text (e.g. channel name).
flashes. Then, [SR ![number)]](images/books/1132/pages/13/parsin14.gif) (bank
(bank
number)]
is displayed and you will hear beep
sound at the same time.
3. SR  (bank number)
![(preset number) (channel number)]](images/books/1132/pages/13/parsin14.gif) CH
CH![(preset number) (channel number)]](images/books/1132/pages/13/parsin14.gif)
(preset number) (channel number)]
are displayed.
4. Three seconds later, it returns to normal
display. [SR (bank number)
(text
(e.g. channel name))
NOTE:
Six stations can be stored in each bank, SR1,
SR2, and SR3 for convenient access to your
favorite stations.
Preset channel call-up
Press and release the channel preset
button,
[SR  (bank number)
 CH
CH
![number) (channel number)]](images/books/1132/pages/13/parsin14.gif) (preset
(preset
number)  (channel number)]
appears.
When the preset button is pressed during text mode, its channel number is displayed first for three second and then its text is displayed.
NOTE:
In the initial setting, all channels are preset to
184.
Category change
Press the category button (UP or DOWN).
and select the desired category.
- Press the category button (UP):
Category up
- Press the category button (DOWN):
Category down
Every time the category (UP) button is
pressed for 1.5 second or less, the
category is changed over in the order
shown below.
At this time, the lowest (smallest-number).
channel within the category indicated is received.
When the highest (or lowest) category is reached, the category is changed over in the order shown below.
Highest category→ Category all → Lowest category
NOTE:
While in “CATEGORY ALL” mode, all
channels covering a category can be accessed
(Category off condition).
Channel selection within a category
If category is not in “ALL” and the channel number is displayed, turning the manual tuning dial moves the channel number up/down in the present category.
- Turn the manual tuning dial clockwise:
Channel Up
- Turn the manual tuning dial
counterclockwise: Channel Down
NOTE:
The channel number needs to be indicated in
the display to use manual tuning dial for this
function.
Channel number, channel name, category, artist, song titles and info display
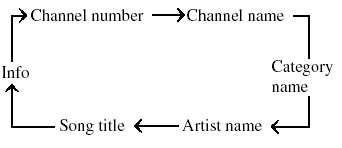
Each time the text button is pressed during SIRIUS reception, the display of the text data is changed over in the order shown below.
NOTE:
- Ten characters are displayed on one screen.
- To display the rest of the characters of a
long title, press and hold the text button
(  ). The display scrolls the
next ten
characters. Press and hold the text button
( ) again after the last ten
characters have been displayed to return to
the beginning of the title.
(Channel number display)
- When the text button is pressed while in info display mode, the mode changes to the channel number display mode.
(Channel name display)
- When the text button is pressed while in channel number display mode, it changes to channel name display mode.
- There are short (eight fixed characters).
and long names for the channel name.
- The long name is displayed first, and three seconds later the short name is displayed. If there is no short name, the long name is displayed.
- To display the rest of the characters of the channel name, press and hold the text button (TEXT). The display scrolls the next ten characters. Press and hold the text button (TEXT) again after the last ten characters have been displayed to return to the beginning of the title.
- Press and hold the text button while the short name is displayed to switch the display to the long name.
- Three seconds after scrolling the long name, the display automatically returns to the first part of the long name. Three more seconds and the short name appears.
- If there is no channel name, “NO TITLE” is displayed.
(Category name display)
- When the text button is pressed while in channel name display mode, it changes to the category name display mode.
- There are short (eight fixed characters).
and long names for the category name.
- The long name is displayed first, and three seconds later the short name is displayed. If there is no short name, the long name is displayed.
- To display the rest of the characters of the category name, press and hold the text button (TEXT). The display scrolls the next ten characters. Press and hold the text button (TEXT) again after the last ten characters have been displayed to return to the beginning of the title.
- Press and hold the text button while the short name is displayed to switch the display to the long name.
- Three seconds after scrolling the long name, the display automatically returns to display the first part of the long name. Three more seconds and the short name appears.
- If there is no category name, “NO CATEGORY” is displayed.
(Artist name display)
- When the text button is pressed while in category name display mode, it changes to the artist name display mode.
- To display the rest of the characters of the artist's name, press and hold the text button (TEXT). The display scrolls the next ten characters. Press and hold the text button (TEXT) again after the last ten characters have been displayed to return to the beginning of the title.
- Three seconds after scrolling the artist name, the display automatically return to display the first part of the artist's name.
- If there is no artist's name, “NO ARTIST” is displayed.
(Song title display)
- When the text button is pressed while in artist name display mode, it changes to the song title display mode.
- To display the rest of the characters of the song title, press and hold the text button (TEXT). The display scrolls the next ten characters. Press and hold the text button (TEXT) again after the last ten characters have been displayed to return to the beginning of the title.
- Three more seconds after scrolling the song title, the display automatically returns to display the first part of the song title.
- If there is no song title, “NO SONG” is displayed.
(INFO (such as composer's name).
display)
- When the text button is pressed while in song title display mode, it changes to the INFO display mode.
- To display the rest of the characters of the composer's name, press and hold the text button (TEXT). The display scrolls the next ten characters. Press and hold the text button (TEXT) again after the last ten characters have been displayed to return to the beginning of the title.
- Three seconds after scrolling the text, the display automatically returns to display the first part of the text.
- If there is no composer name, “NO INFO” is displayed.
Instant replay
This function allows you to rewind and replay the program that you were previously or are currently listening to.
Press the instant replay button (
).
When the seek tuning button (  )
)
is
pressed (about 1.5 seconds), playback
starts from the beginning of the current
program.
When the seek tuning button (  )
)
is
pressed twice, playback starts from the
beginning of the previous program.
When the seek tuning button (  )
)
is
pressed for about 1.5 seconds or longer,
the program is reversed while the button
is being pressed.
When the seek tuning button (
) is
pressed (about 1.5 seconds), playback
starts from the beginning of the next
program. When the seek tuning button
(  ) is pressed (about 1.5
seconds) while
the last program is being played, the
instant replay mode is cancelled.
When the seek tuning button (
) is
pressed for 1.5 seconds or longer, the
program is fast-forwarded while the
button is being pressed. When pressing
and holding the button until the end of the
program, the instant replay mode is
cancelled.
When the instant replay button is pressed again, playback is paused, or playback starts if it has been paused.
NOTE:
- If the channel is changed, the instant replay
buffer data is deleted.
- After turning on the power and switching to SIRIUS digital satellite radio mode, the instant replay mode is not available for several seconds after changing channels.
Displaying the SIRIUS ID (ESN)
When the ESN button is pressed for 1.5 seconds or longer, a 12-digit Electronic Serial Number (ESN) for the SIRIUS tuner is displayed.
(If the SIRIUS ID (ESN) for the tuner does not display)
If “ESN  FAIL” is
displayed after
pressing the ESN button for 1.5 seconds
or longer, contact an Authorized Mazda
Dealer.
Initialization of ID code
If the registered ID code is forgotten, return the ID code to the default [0000] by performing the following steps: Setting condition: SAT mode
(Master code input preparation)
1. Hold the scan button, then press channel preset button 4, hold both buttons together for 1.5 seconds.
2. “ENTER PIN” appears for three seconds which indicates that it is in code input mode.
3. “SR1 - - - -” appears, which indicates that it is ready for code input.
(Master code input)
4. Input the master code using the channel preset buttons 1-4.
(The master code is already set at the time of factory shipment.)
(Master code input determination)
5. Determine the master code which has been input by pressing the scan button.
6. “PIN CLEARED” appears which indicates that the master code input has been completed.
7. The ID code is set to the default [0000] and the initialization process is completed.
NOTE:
Master code:
The Master Code is used to initialize or reinitialize
the ID code in the event that the code
is not set to [0000] and/or the personalized ID
code is not known. The initialization process
resets the ID code to [0000]. The master code
can potentially defeat the intent of the security
of the parental lock if it is located by persons
not authorized by the owner to access certain
channels.
SIRIUS Satellite Radio Master Code: [0913]
NOTE:
- When a numeric value other than the
master code is input and the scan button is
pressed, “SR1 Err” is displayed and then it
returns to the “SR1 - - - -” display again.
- If an ID code is not input for ten seconds, “Err” is displayed and it returns to the former display.
- Channel preset buttons 1, 2, 3, 4 and the scan button are used for inputting the ID code. Buttons 5 and 6 cannot be used.
Change of ID code
Setting condition: SAT mode When changing the ID code, the new ID code is input after the previous one is input first.
(Registered ID code input)
1. Hold the scan button, then press channel preset button 5, hold both buttons together for 1.5 seconds.
2. “ENTER PIN” appears for three seconds which indicates that it is in code input mode.
3. “SR1 - - - -” appears, which indicates that it is ready for code input.
4. Input the registered ID code using channel preset buttons 1-4.
Example: When the registered ID code is “2323”, input “2323”. At this time “SR1 2323” is displayed.
Press 1 for the first digit, 2 for the second, 3 for the third, and 4 for the last digit. For example, if your number is 2323, press 1 three times, 2 four times, 3 three, and 4 four times. If the display goes off while inputting, begin from Step 1.
NOTE:
The registered ID code is the default [0000] at
the time of factory shipment. If [0000] results
in “Err” on the display, go to the
“INITIALIZATION OF ID CODE” section to
reset to [0000].
(Verification with the registered ID code)
5. Determine the input code by pressing the scan button.
6. If it does not match with the previously registered code, “SR1 Err” is displayed and then it returns to “SR1 - - - -”.
7. If it matches with the previously registered code, “ENTER PIN” appears again and it switches to code input mode.
8. “SR1 - - - -” appears, and it is ready for input of the new ID code.
(New ID code input)
9. Input the new ID code using channel preset buttons 1-4.
Example: If “1234” is input as the new code, “SR1 1234” is displayed.
(New ID code input determination)
10. Determine the new ID code which has been input by pressing the scan button.
11. “PIN CHANGED” appears for three seconds which indicates that the new ID code input has been completed.
12. It returns to the former display.
NOTE:
- If an ID code is not input for ten seconds,
“Err” is displayed and it returns to the
former display.
- Channel preset buttons 1, 2, 3, 4 and the scan button are used for input of the ID code. Buttons 5 and 6 cannot be used.
Individual channel locking
If a channel is locked, the channel is muted.
NOTE:
If the registered ID code is forgotten, return
the ID code to the default [0000]. (See
“INTIALIZATION OF ID CODE” section)
(Locking a channel)
1. Select a channel to be locked by turning the manual tuning dial.
Example: Select channel 100
(Registered ID code input preparation)
2. Hold the scan button, then press channel preset button 6, hold both buttons together for 1.5 seconds.
3. “ENTER PIN” appears for three seconds which indicates that it is in code input mode.
4. “SR1 - - - -” appears which indicates that it is ready for code input.
(Registered ID code input)
5. Input the registered ID code using channel preset buttons 1-4. Example: If the registered ID code is “2323”, input “2323”. At this time “SR1 2323” is displayed.
(Registered ID code input determination)
6. Determine the code which has been input by pressing the scan button.
7. If it does not match the registered code, “SR1 Err” is displayed and then it returns to “SR1 - - - -”.
8. If it matches the registered code, “SR1 LOCK” appears for three seconds which indicates that the code input has been completed.
9. “SR1 LOCK 100” appears which indicates that the parental lock is activated. At this time, mute is on and no sound is heard.
NOTE:
- If an ID code is not input for ten seconds,
“Err” is displayed and it returns to the
former display.
- Channel preset buttons 1, 2, 3, 4 and the scan button are used for input of the ID code. Buttons 5 and 6 cannot be used.
Lock cancellation
Setting condition: SAT mode
(Releasing a locked channel)
1. Select a channel to be released by turning the manual tuning dial.
Example: Select the locked channel (i.e. 100). At this time, “SR1 LOCK 100” is displayed.
(Registered ID code input preparation)
2. Hold the scan button, then press channel preset button 6, hold both buttons together for 1.5 seconds.
3. “ENTER PIN” appears for three seconds which indicates that it is in code input mode.
4. “SR1 - - - -” appears, which indicates that it is ready for code input.
(Registered ID code input)
5. Input the registered ID code using channel preset buttons 1-4. Example: When the registered ID code is “2323”, input “2323”. At this time “SR1 2323” is displayed.
NOTE:
If “Err” is displayed, go to the
“INITIALIZATION OF ID CODE” section to
reset the ID code to [0000].
(Registered ID code input determination)
6. Determine the input code by pressing the scan button.
7. If it does not match the registered code, “SR1 Err” is displayed and then it returns to “SR1 - - - -”.
8. If it matches the registered code, “SR1 UNLOCK” appears for three seconds which indicates that the code input has been completed.
9. “SR1 100” appears which indicates that the parental lock is off. At this time, sound is heard.
NOTE:
- If an ID code is not input for ten seconds,
“Err” is displayed and it returns to the
former display.
- Channel preset buttons 1, 2, 3, 4 and the scan button are used for input of the ID code. Buttons 5 and 6 cannot be used.
Error signs
(1) Depending on the surrounding conditions (such as large trees, buildings, or tunnels) and special weather conditions, the reception of SIRIUS radio waves may be decreased or temporarily interrupted.
“ACQUIRING” may appear.
(2) In case of an antenna malfunction, “ANTENNA FAIL” is displayed.
Check the satellite radio antenna, antenna cable and DLP antenna connector.
NOTE:
If a broken DLP* unit is replaced with a new
unit, cancel the license for the broken unit and
make sure to carry out new registration for the
replaced unit. If the license for the broken unit
is not canceled, you will be charged a
reception fee for both units.
* DLP: Down Link Processor (SATELLITE RADIO Module)
Operating the Compact Disc (CD) Player
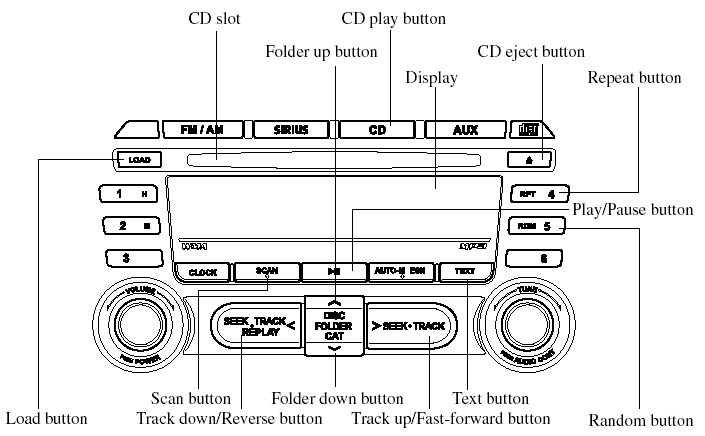

NOTE:
If a disc has both music data (CD-DA) and
MP3/WMA files, playback of the two or three
file types differs depending on how the disc
was recorded.
Inserting the CD
Insert the CD into the slot, label-side up.
The auto-loading mechanism will set the CD and begin play.
NOTE:
There will be a short lapse before play begins
while the player reads the digital signals on
the CD.
Ejecting the CD
Press the CD eject button (
) to eject the
CD.
Playback
Press the CD play button (
) to start
play when a CD is in the unit.
If a CD is not in the unit when the CD
play button (  ) is pressed,
“NO DISC”
will flash on and off.
NOTE:
When the load button (  ) is
) is
pressed, the
CD will load and play even if the CD eject
button ( ) had been previously
pressed.
Pause
To stop playback, press the Play/Pause
button (  ).
).
Press the button again to resume
playback.
Fast-forward/Reverse
Press and hold the fast-forward button
( ) to advance through a track
at high
speed.
Press and hold the reverse button (
) to
reverse through a track at high speed.
Track search
Press the track up button (
) once to skip
forward to the beginning of the next track.
Press the track down button (
) once to
skip back to the beginning of the current
track.
Folder search (during MP3/WMA CD playback)
To change to the previous folder, press the
folder down button ( ), or
), or
press the
folder up button (  ) to
) to
advance to the
next folder.
Music scan
This feature helps to find a program by playing about the first 10 seconds of each track.
Press the scan button (  )
)
during
playback to start the scan play operation
(the track number will flash).
Press the scan button (  )
)
again to
cancel scan playback.
NOTE:
If the unit is left in scan, normal playback will
resume where scan was selected.
Repeat playback
During music CD playback
1. Press the repeat button (
 ) during
playback to play the current track
repeatedly. “RPT” is displayed.
2. Press the button again to cancel the repeat playback.
During MP3/WMA CD playback
(Track repeat)
1. Press the repeat button (
 ) during
playback to play the current track
repeatedly. After “TRACK RPT” is
displayed, “RPT” is displayed.
2. To cancel the repeat playback, press the button again after 3 seconds.
(Folder repeat)
1. Press the repeat button (
 ) during
playback, and then press the button
again within 3 seconds to play the
tracks in the current folder repeatedly.
After “FOLDER RPT” is displayed, “F-RPT” is displayed.
2. Press the button again to cancel the repeat playback.
Random playback
Tracks are randomly selected and played.
During music CD playback
1. Press the random button (
 ) during
playback to play the tracks on the CD
randomly. “RDM” is displayed.
2. Press the button again to cancel the random playback.
During MP3/WMA CD playback
(Folder random)
1. Press the random button (
) during
playback to play the tracks in the folder
randomly. After “FOLDER RDM” is
displayed, “RDM” is displayed.
2. To cancel the random playback, press the button again after 3 seconds.
(CD random)
1. Press the random button (
 ) during
playback, and then press the button
again within 3 seconds to play the
tracks on the CD randomly. After
“DISC RDM” is displayed, “D-RDM”
is displayed.
2. Press the button again to cancel the random playback.
Switching the display
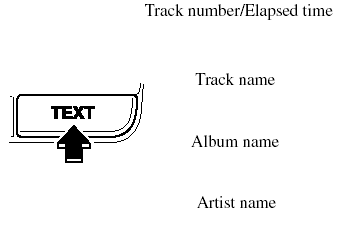
For files with a file name or other name
that have been input, the display changes
in the order of the file names or other
names each time the text button (
 ).
).
is pressed during playback.
Music CD
MP3/WMA CD
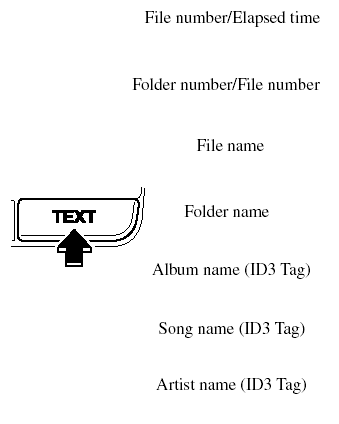
NOTE:
(MP3/WMA CD).
This unit can only read English (including numerals) one-byte characters. Depending on the CD writing software used, proper display may not be possible.
Display scroll
Only 13 characters can be displayed at
one time. To display the rest of the
characters of a long title, press and hold
the text button (  ). The display
scrolls the next 13 characters. Press and
hold the text button (  ) again after
the last 13 characters have been displayed
to return to the beginning of the title.
NOTE:
The displayable number of characters is
limited. If the number of characters, including
the file extension (.mp3/.wma), exceeds 32
characters, it may not be fully displayed.
Message display
If “CHECK CD” is displayed, it means that there is some CD malfunction. Check the CD for damage, dirt, or smudges, and then properly reinsert. If the message appears again, take the unit to an Authorized Mazda Dealer for service.
Message display
If “CHECK CD” is displayed, it means that there is some CD malfunction. Check the CD for damage, dirt, or smudges, and then properly reinsert. If the message appears again, take the unit to an Authorized Mazda Dealer for service.
Operating the In-Dash CD Changer
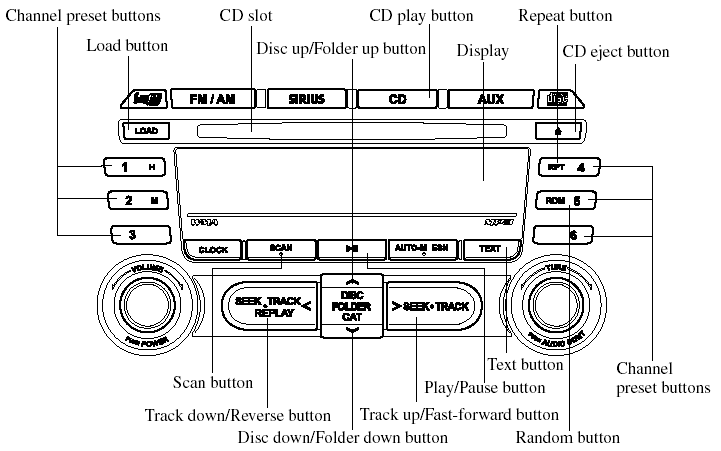

NOTE:
If a disc has both music data (CD-DA) and
MP3/WMA files, playback of the two or three
file types differs depending on how the disc
was recorded.
Inserting the CD
The CD must be label-side up when inserting. The auto-loading mechanism will set the CD and begin play.
NOTE:
The CD will begin playback automatically
after insertion.
A CD cannot be inserted while the display reads “WAIT”. A beeping sound can be heard during this waiting time.
There will be a short lapse before play begins while the player reads the digital signals on the CD.
Normal insertion
1. Press the load button (  ).
).
2. When “IN” is displayed, insert the CD.
Inserting CDs into desired tray number
1. Press and hold the load button (
 ).
).
for about 2 seconds until a beep sound
is heard.
2. Press the channel preset button for the desired tray number while “WAIT” is displayed.
3. When “IN” is displayed, insert the CD.
NOTE:
The CD cannot be inserted to the desired tray
number if the number is already occupied.
Multiple insertion
1. Press and hold the load button (
 ).
).
for about 2 seconds until a beep sound
is heard.
2. When “IN” is displayed, insert the CD.
3. When “IN” is displayed again, insert the next CD.
NOTE:
The first-inserted CD will be played
automatically when:
- No other CD is inserted within 15 seconds
after “IN” is displayed.
- The CD trays are full.
Ejecting the CD
Normal ejection
1. Press the CD eject button (
). The
disc number and “DISC OUT” will be
displayed.
2. Pull out the CD.
NOTE:
When the CD is ejected during play, the next
CD will be played automatically.
Ejecting CDs from desired tray number
1. Press and hold the CD eject button (
 ).
).
for about 2 seconds until a beep sound
is heard.
The “DISC OUT” display flashes.
2. Press the channel preset button for the desired CD number for less than 5 seconds after the beep sound is heard.
3. Pull out the CD.
Multiple ejection
1. Press and hold the CD eject button (
 ).
).
for about 2 seconds until a beep sound
is heard.
The “DISC OUT” display flashes.
2. Pull out the CD, then the next CD will be ejected.
NOTE:
- CDs will be ejected starting with the one
with the lowest number.
- All CDs in the tray will be ejected continuously.
- CDs can be ejected when the ignition
switch is off. Press and hold the CD eject
button (  ) for about 2 seconds
and all
CDs will eject.
Playback
Press the CD play button (  )
)
to start
play when a CD is in the unit.
If a CD is not in the unit when the CD
play button (  ) is pressed,
“NO DISC”
will flash on and off.
Pause
To stop playback, press the Play/Pause
button (  ).
).
Press the button again to resume
playback.
Fast-forward/Reverse
Press and hold the fast-forward button
( ) to advance through a
track at high
speed.
Press and hold the reverse button (
 ) to
) to
reverse through a track at high speed.
Track search
Press the track up button (
 ) once to skip
forward to the beginning of the next track.
Press the track down button (  )
)
once to
skip back to the beginning of the current
track.
Disc search
During music CD playback
To change the disc, press the DISC button
( ) during playback.
During MP3/WMA CD playback
To change the disc, press the DISC button
(  ) for 1.5 seconds or more
during playback.
Folder search (during MP3/WMA CD playback)
To change to the previous folder, press the
folder down button (  ) for
) for
less than 1.5
seconds, or press the folder up button
(  ) for less than 1.5 seconds
to advance
to the next folder.
Music scan
This feature helps to find a program by playing about the first 10 seconds of each track.
Press the scan button (  )
)
during
playback to start the scan play operation
(the track number will flash).
Press the scan button (  )
)
again to
cancel scan playback.
NOTE:
If the unit is left in scan, normal playback will
resume where scan was selected.
Repeat playback
During music CD playback
1. Press the repeat button (
) during
playback to play the current track
repeatedly. “RPT” is displayed.
2. Press the button again to cancel the repeat playback.
During MP3/WMA CD playback
(Track repeat)
1. Press the repeat button (
 ) during
playback to play the current track
repeatedly. After “TRACK RPT” is
displayed, “RPT” is displayed.
2. To cancel the repeat playback, press the button again after 3 seconds.
(Folder repeat)
1. Press the repeat button (
 ) during
playback, and then press the button
again within 3 seconds to play the
tracks in the current folder repeatedly.
After “FOLDER RPT” is displayed, “F-RPT” is displayed.
2. Press the button again to cancel the repeat playback.
Random playback
Tracks are randomly selected and played.
During music CD playback
1. Press the random button (
) during
playback to play the tracks in the CD
randomly. “RDM” is displayed.
2. Press the button again to cancel the random playback.
During MP3/WMA CD playback
(Folder random)
1. Press the random button (
 ) during
playback to play the tracks in the folder
randomly. After “FOLDER RDM” is
displayed, “RDM” is displayed.
2. To cancel the random playback, press the button again after 3 seconds.
(CD random)
1. Press the random button (
 ) during
playback, and then press the button
again within 3 seconds to play the
tracks on the CD randomly. After
“DISC RDM” is displayed, “D-RDM”
is displayed.
2. Press the button again to cancel the random playback.
Switching the display
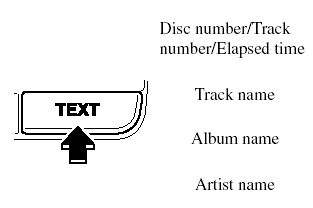
For files with a file name or other name
that have been input, the display changes
in the order of the file names or other
names each time the text button (
).
is pressed during playback.
Music CD
MP3/WMA CD
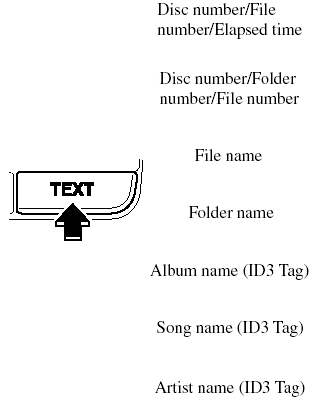
NOTE:
(MP3/WMA CD).
This unit can only read English (including numerals) one-byte characters. Depending on the CD writing software used, proper display may not be possible.
Display scroll
Only 13 characters can be displayed at
one time. To display the rest of the
characters of a long title, press and hold
the text button (  ). The
display
scrolls the next 13 characters. Press and
hold the text button (  )
)
again after
the last 13 characters have been displayed
to return to the beginning of the title.
NOTE:
The displayable number of characters is
limited. If the number of characters, including
the file extension (.mp3/.wma), exceeds 32
characters, it may not be fully displayed.
Message display
If “CHECK CD” is displayed, it means that there is some CD malfunction. Check the CD for damage, dirt, or smudges, and then properly reinsert. If the message appears again, take the unit to an Authorized Mazda Dealer for service.
Operating the Auxiliary jack
You can connect portable audio units or similar products on the market to the auxiliary jack to listen to music or audio over the vehicle's speakers, refer to Auxiliary Input.
Error Indications

If you see an error indication on the display, find the cause in the chart.
If you cannot clear
the error indication, take the vehicle to an Authorized Mazda Dealer.
See also:
Mirrors
qOutside Mirrors
Check the mirror angles before driving.
Mirror type
Flat type (driver's side).
Flat surface mirror.
Convex type (passenger side).
The mirror has single curvature on its
surface ...
Cell Phones Warning
WARNING:
Please comply with the legal regulations concerning the use of communication
equipment in vehicles in your State or Province:
Use of any electrical devices such as cell phones, computers, ...
Washer Fluid
InspectingWasher Fluid Level
WARNING.
Use only windshield washer fluid or
plain water in the reservoir:
Using radiator antifreeze as washer
fluid is dangerous. If sprayed on the
windshield, it w ...


