

Center-Rear Position Seat Belt (3-Point Type)
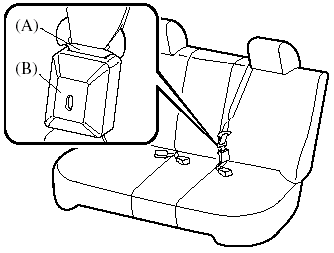
Before using the center-rear lap/shoulder belt make sure tongue (A) and anchor buckle (B) are fastened.
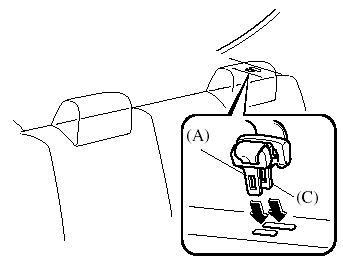
Fastening the Seat Belt
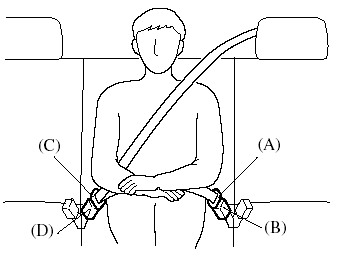
1. Grasp the tongue (C).
2. Slowly pull out the lap/shoulder belt.
3. Insert the tongue (C) into the buckle (D) until you hear a click.
WARNING:
Fastening the Center-Rear Seat Belt
with Only One Buckle:
Fastening the center-rear seat belt
with only one buckle is dangerous. If
only one pair of seat belt tongue and
buckle, either tongue (A) and anchor
buckle (B) or tongue (C) and anchor
buckle (D), is fastened, the seat belt
cannot provide full protection. In a
sudden stop or collision, the user
could slide under the belt and suffer
serious injuries. Always make sure
that both pairs of seat belt tongues
and buckles are fastened properly.
Positioning the Shoulder Portion of the
Seat Belt:
Improper positioning of the shoulder
portion of the seat belt is dangerous.
Always make sure the shoulder portion of the seat belt is positioned across your shoulder and near your neck, but never under your arm, on your neck, or on your upper arm.
4. Position the lap belt as low as possible, not on the abdominal area, then adjust the shoulder belt so that it fits snugly against your body.
WARNING:
Positioning the Lap Portion of the Seat
Belt:
The lap portion of the seat belt worn
too high is dangerous. In a collision,
this would concentrate the impact
force directly on the abdominal area,
causing serious injury. Wear the lap
portion of the belt snugly and as low
as possible.
Unfastening the Seat Belt

Depress the button on the buckle. If the belt does not fully retract, pull it out and check for kinks or twists. Then make sure it remains untwisted as it retracts.
NOTE:
If a belt does not fully retract, inspect it for
kinks and twists. If it is still not retracting
properly, have it inspected at an Authorized
Mazda Dealer.
Unfastening the Lap Portion of the Seat Belt
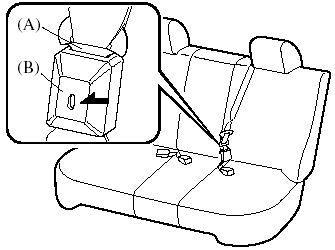
Insert a small object such as a key in the anchor buckle (B) slot.
CAUTION:
Always unfasten the lap portion of
the belt before folding the left-rear
seatback. Leaving the lap portion of
the belt fastened could cause
damage to the seat belt, buckle and
seatback.
NOTE:
To encourage rear seat passengers to wear
their seat belts, we suggest leaving the centerrear
lap position of the belt fastened at all
times except when folding the rear seat
forward.
Fastening the Lap Portion of the Seat Belt
Grasp tongue (A) and insert it into the anchor buckle (B) until you hear a click. It is now secure for passenger use.
NOTE:
After returning the left-rear seatback to its
upright position, fasten the lap portion of the
belt.
Stowing and pulling out the Center-Rear Position Seat Belt
The center-rear position seat belt can be stowed using the following procedure.
CAUTION:
When stowing the seat belt, make
sure the belt is locked securely into
the recess. If the seat belt is not
properly stowed, it might get caught
in the seats and be damaged.
To stow the seat belt, retract the belt, put tongues (A) and (C) together and insert them into the recess.
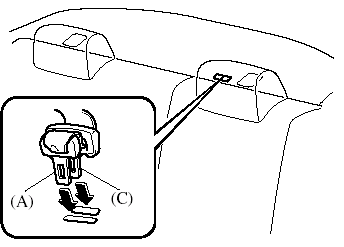
Sedan (Behind head restraint on left side)
Hatchback (Left side of luggage compartment)
To pull out the seat belt, slide tongues with your finger, and slowly pull out the seat belt from the recess.
NOTE:
Pulling the seat belt all the way out will switch
it to automatic locking mode. If automatic
locking mode is not needed, retract the seat
belt fully to convert it back to emergency
locking mode.
See also:
Cruise Control
With cruise control, you can set and
automatically maintain any speed of more
than about 30 km/h (19 mph).
WARNING:
Do not use the cruise control under the
following conditions:
Using the cruise ...
Exterior
Comparatively upright in profile, the Mazda3 is built with a wide track and a
relatively long (103.9-inch) wheelbase for its size. A Sport Package that
includes sport bumpers, side skirts, 17-inch ...
Bottle Holder
Bottle holders are on the inside of the
front doors.
CAUTION:
Do not use the bottle holders for
containers without caps. The
contents may spill when the door is
opened or closed. ...