

Audio Set
Audio information is displayed on the information display.
Power/Volume/Sound Controls
Operating the Radio
Operating the Compact Disc (CD) Player
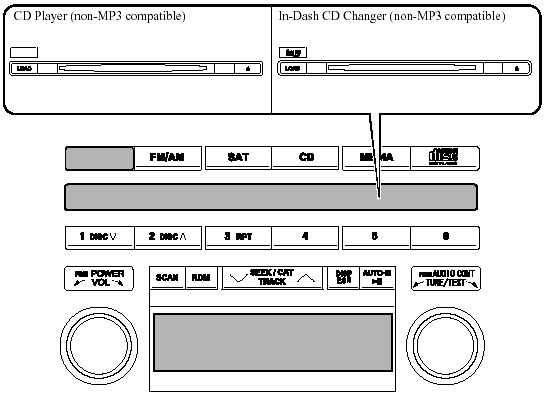
Operating the In-Dash CD Changer
Operating the Auxiliary jack
Error Indications
Power/Volume/Sound Controls
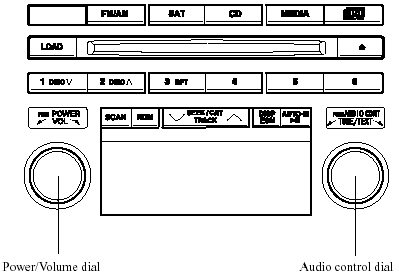
Power ON/OFF
Turn the ignition switch to the ACC or ON position.
Press the power/volume dial to turn the audio system on.
Press the power/volume dial again to turn the audio system off.
NOTE.
To prevent the battery from being discharged, do not leave the audio system on for a long period of time when the engine is not running.
Volume adjustment
To adjust the volume, turn the power/ volume dial.
Turn the power/volume dial to the right to increase volume, to the left to decrease it.
Audio sound adjustment
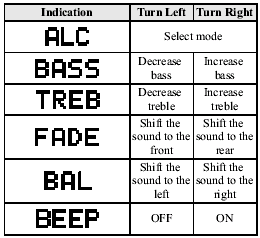
1. Press the audio control dial to select the function. The selected function will be indicated.
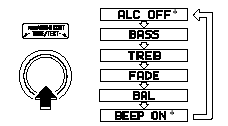
* Depending on the mode selected, the indication changes.
2. Turn the audio control dial to adjust the selected functions as follows:
NOTE.
About 5 seconds after selecting any mode, the volume function will be automatically selected.
To reset bass, treble, fade, and balance, press the audio control dial for 2 seconds. The unit will beep and “CLEAR” will be displayed.
Automatic Level Control (ALC)
The automatic level control is a feature that automatically adjusts audio volume and sound quality according to the vehicle speed.
The volume increases in accordance with the increase in vehicle speed, and decreases as vehicle speed decreases.
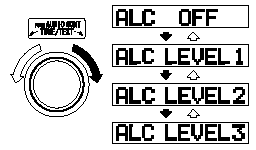
CD Player type
Select the desired ALC mode.
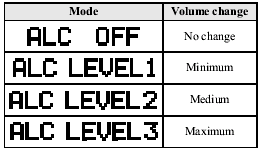
Turn the audio control dial to select ALC OFF or ALC LEVEL1 - 3 modes. The selected mode will be indicated.
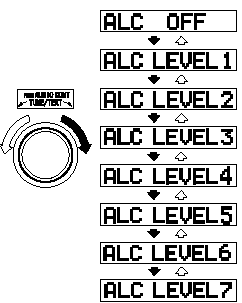
In-Dash CD Changer type
Select the desired ALC mode.
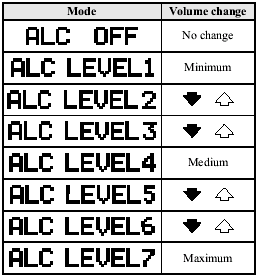
Turn the audio control dial to select ALC OFF or ALC LEVEL1 - 7 modes. The selected mode will be indicated.
BEEP setting
The beep-sound when operating the audio system can be set on or off.
Operating the Radio
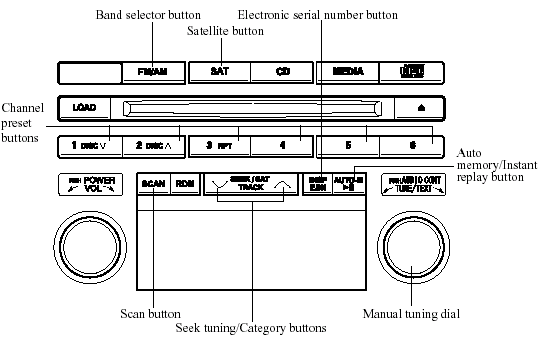
Radio ON
Press a band selector button ( ) to
) to
turn the radio on.
Band selection
Successively pressing the band selector
button () switches the bands as
follows: FM1→FM2→AM.
The selected mode will be indicated. If FM stereo is being received, “ST” will be displayed.
NOTE.
If the FM broadcast signal becomes weak, reception automatically changes from STEREO to MONO for reduced noise, and the “ST” indicator will go out.
Tuning
The radio has the following tuning methods: Manual, Seek, Scan, Preset channel, and Auto memory tuning. The easiest way to tune stations is to set them on preset channels.
NOTE.
If the power supply is interrupted (fuse blows or the battery is disconnected), the preset channels will be erased.
Manual tuning
Turning the manual tuning dial will change the frequency higher or lower.
Seek tuning
Pressing the seek tuning/category button
(  ,
,
 ) will cause the tuner to seek a
higher or lower frequency automatically.
NOTE.
If you continue to press and hold the button, the frequency will continue changing without stopping.
Scan tuning
Press the scan button ( ) to
) to
automatically sample strong stations.
Scanning stops at each station for about 5
seconds. To hold a station, press the scan
button () again during this interval.
Preset channel tuning
The 6 preset channels can be used to store 6 AM and 12 FM stations.
1. To set a channel first select AM, FM1, or FM2. Tune to the desired station.
2. Depress a channel preset button for about 2 seconds until a beep sound is heard. The preset channel number and station frequency will be displayed.
The station is now held in the memory.
3. Repeat this operation for the other stations and bands you want to store.
To tune one in the memory, select AM, FM1, or FM2 and then press its channel preset button. The station frequency and the channel number will be displayed.
NOTE.
If the power supply is interrupted (fuse blows or the battery is disconnected), the preset channels will be erased.
Auto memory tuning
This is especially useful when driving in an area where the local stations are not known. Additional AM/FM stations can be stored without disturbing the previously set channels.
Press and hold the auto memory/instant
replay button ( ) for about 2
seconds until a beep sound is heard; the
system will automatically scan and
temporarily store up to 6 stations with the
strongest frequencies in each selected
band in that area.
After scanning is completed, the station with the strongest frequency will be tuned and its frequency displayed.
Press and release the auto memory/instant
replay button () to recall stations
from the auto-stored stations. One stored
station will be selected each time; its
frequency and channel number will be
displayed.
NOTE.
If no stations can be tuned after scanning operations, “A” will be displayed.
SATELLITE RADIO (SAT)
Vehicles equipped with the separately purchased SIRIUS digital satellite radio unit have the ability to receive channels of digital quality programming coast to coast via satellite. For information on use, read the Satellite Radio Kit manual accompanying the SIRIUS digital satellite radio unit. A subscription to SIRIUS digital satellite radio service is required (available in the U.S. - Except Alaska and Hawaii) to enable this feature once the separately purchased SIRIUS digital satellite radio unit has been installed. For subscription and channel information, or for digital satellite radio technical issues, contact SIRIUS directly at: - Web: www.siriusradio.com.
- Phone (24 hrs/day, 7 days/week): 888- 539-SIRI (7474).
- E-mail: customercare@sirius-radio.com.
- Mailing Address: Sirius Satellite Radio
1221 Avenue Of The Americas
New York, NY 10020
Attention: Customer Care
Include your Sirius Radio ESN (Electronic Serial Number) when subscribing or requesting technical assistance. See the Satellite Radio Kit manual accompanying the SIRIUS unit for complete satellite radio activation procedures and information on how to display the ESN#.
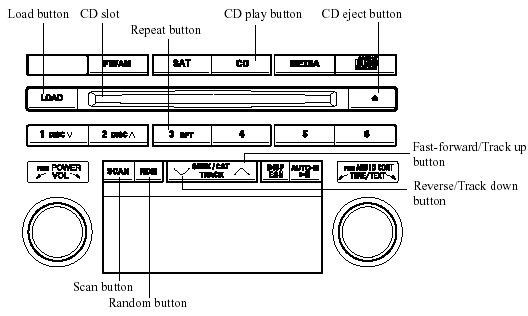
Operating the Compact Disc (CD) Player
| Type | Playable data |
| Music CD player (non-MP3 compatible) | Music data (CD-DA) |
Inserting the CD
Insert the CD into the slot, label-side up.
The auto-loading mechanism will set the CD and begin play.
NOTE.
There will be a short lapse before play begins while the player reads the digital signals on the CD.
Ejecting the CD
Press the CD eject button ( ) to eject
the
CD.
Playback
Press the CD play button ( ) to start
play when a CD is in the unit.
If a CD is not in the unit when the CD
play button () is pressed, “NO DISC”
will flash on and off.
NOTE.
When the load button ( ) is pressed, the
CD will load and play even if the CD eject
button (
) had been previously
pressed.
Fast-forward/Reverse
Press and hold the fast-forward button
( ) to advance through a track at high
speed.
Press and hold the reverse button ( ) to
) to
reverse through a track at high speed.
Track search
Press the track up button () once to
skip
forward to the beginning of the next track.
Press the track down button () once to
skip back to the beginning of the current
track.
Music scan
This feature helps to find a program by playing about the first 10 seconds of each track.
Press the scan button () during
playback to start the scan play operation
(the track number will flash).
Press the scan button () again to
cancel scan playback.
NOTE.
If the unit is left in scan, normal playback will resume where scan was selected.
Repeat playback
This feature makes it possible to listen to a selection repeatedly.
Press the repeat button ( ) during
playback. The current selection will be
repeated (“RPT” will be displayed).
Press the repeat button () once again
to cancel repeat playback.
Random playback
This feature allows the CD player to randomly select the order of the songs.
Press the random button ( ) during
playback. The next selection will be
randomly selected (“RDM” will be
displayed).
Press the random button () once
again to cancel random playback.
Message display
If “CHECK CD” is displayed, it means that there is some CD malfunction. Check the CD for damage, dirt, or smudges, and then properly reinsert. If the message appears again, take the unit to an Authorized Mazda Dealer for service.
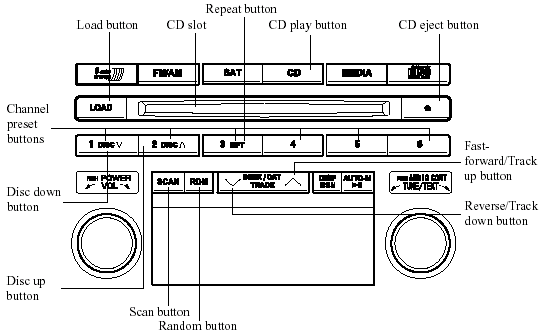
Operating the In-Dash CD Changer
| Type | Playable data |
| Music CD player (non-MP3 compatible) | Music data (CD-DA) |
Inserting the CD
The CD must be label-side up when inserting. The auto-loading mechanism will set the CD and begin play.
The disc number and the track number will be displayed.
NOTE.
The CD will begin playback automatically after insertion.
A CD cannot be inserted while the display reads “WAIT”. A beeping sound can be heard during this waiting time.
There will be a short lapse before play begins while the player reads the digital signals on the CD.
Normal insertion
1. Press the load button (
).
2. When “IN” is displayed, insert the CD.
Inserting CDs into desired tray number
1. Press and hold the load button (
)
for about 2 seconds until a beep sound
is heard.
2. Press the channel preset button for the desired tray number while “WAIT” is displayed.
3. When “IN” is displayed, insert the CD.
NOTE.
The CD cannot be inserted to the desired tray number if the number is already occupied.
Multiple insertion
1. Press and hold the load button (
)
for about 2 seconds until a beep sound
is heard.
2. When “IN” is displayed, insert the CD.
3. When “IN” is displayed again, insert the next CD.
NOTE.
The first-inserted CD will be played
automatically when:
- No other CD is inserted within 15 seconds
after “IN” is displayed.
- The CD trays are full.
Displaying the CD-inserted tray number
When you want to know the number for a
CD-inserted tray, press the display button
( ). The tray number will be displayed
for 5 seconds.
Ejecting the CD
Normal ejection
1. Press the CD eject button (). The
disc number and “DISC OUT” will be
displayed.
2. Pull out the CD.
NOTE.
When the CD is ejected during play, the next CD will be played automatically.
Ejecting CDs from desired tray number
1. Press and hold the CD eject button ()
for about 2 seconds until a beep sound
is heard.
The “DISC OUT” display flashes.
2. Press the channel preset button for the desired CD number for less than 5 seconds after the beep sound is heard.
3. Pull out the CD.
Multiple ejection
1. Press and hold the CD eject button ()
for about 2 seconds until a beep sound
is heard.
The “DISC OUT” display flashes.
2. Press the CD eject button () again
for less than 5 seconds after the beep
sound is heard.
NOTE.
If the button is not pressed and about 5 seconds have elapsed while “DISC OUT” is flashing, CDs are automatically ejected.
3. Pull out the CD, then the next CD will be ejected.
NOTE.
- CDs will be ejected starting with the one with the lowest number.
- All CDs in the tray will be ejected continuously.
- CDs can be ejected when the ignition switch is off. Press and hold the CD eject button (
) for about 2 seconds and
all
CDs will eject.
Playback
Press the CD play button () to start
play when a CD is in the unit.
If a CD is not in the unit when the CD
play button () is pressed, “NO DISC”
will flash on and off.
Fast-forward/Reverse
Press and hold the fast-forward button
() to advance through a track at high
speed.
Press and hold the reverse button () to
reverse through a track at high speed.
Track search
Press the track up button () once to
skip
forward to the beginning of the next track.
Press the track down button () once to
skip back to the beginning of the current
track.
Disc search
To change the disc, press the DISC button
( or
or
 ) during playback.
Music scan
This feature helps to find a program by playing about the first 10 seconds of each track.
Press the scan button () during
playback to start the scan play operation
(the track number will flash).
Press the scan button () again to
cancel scan playback.
NOTE.
If the unit is left in scan, normal playback will resume where scan was selected.
Repeat playback
1. Press the repeat button () during
playback to play the current track
repeatedly. “RPT” is displayed.
2. Press the button again to cancel the repeat playback.
Random playback
Tracks are randomly selected and played.
1. Press the random button () during
playback to play the tracks in the CD
randomly. “RDM” is displayed.
2. Press the button again to cancel the random playback.
Message display
If “CHECK CD” is displayed, it means that there is some CD malfunction. Check the CD for damage, dirt, or smudges, and then properly reinsert. If the message appears again, take the unit to an Authorized Mazda Dealer for service.
Operating the Auxiliary jack
You can connect portable audio units or similar products on the market to the auxiliary jack to listen to music or audio over the vehicle's speakers, refer to Auxiliary Input.
Error Indications
If you see an error indication on the display, find the cause in the chart.
If you cannot clear
the error indication, take the vehicle to an Authorized Mazda Dealer.
| Indication | Cause | Solution |
| CHECK CD | CD is inserted upside down | Insert the CD properly. If the error indication does not disappear, consult an Authorized Mazda Dealer |
| CD is defective | Insert another CD properly. If the error indication does not disappear, consult an Authorized Mazda Dealer |
See also:
Storage Compartments
WARNING:
Keep storage boxes closed when
driving:
Driving with the storage boxes open
is dangerous. To reduce the
possibility of injury in an accident or
a sudden stop, keep the storage
boxes cl ...
Interior & Safety
Though the car is small, the two-seat configuration provides more driver
space than you might expect. A 6-foot-tall ectomorph, I fit just fine, though it
wouldn't be my first choice for a long dri ...
Manual Type
Manual Type
Control Switches
Temperature control dial
This dial controls temperature. Turn it
clockwise for hot and counterclockwise
for cold.
MAX-A/C position
For quick cabin cooling, rota ...